Proxmox 搭建私有云 HPC (Slurm)
Mac Mini 改造成私有云 HPC 超算 (Slurm 任务调度)。
很多实验室都有自己的服务器,大部分只是把它当作一个共享的高配置电脑来用:例如一台服务器配 4-8 张 NVDIA 显卡,实验室每个人建立一个账号,大家可以远程访问跑代码 (端口映射),但是并不能算作 High Performance Computing 超算平台。
HPC 超算平台需要额外提供 虚拟化 (Hypervisor) 和 任务调度 (Job Scheduler)。比如我用的两个 HPC 平台: ISCA 和 Jade 2,它们用的 OpenStack 云平台 和 Slurm 调度器。
这个网站 HPC-UK 包含了英国的超算平台:https://www.hpc-uk.ac.uk/facilities/。
# Jade 2 HPC 一个节点的 GPU 资源

(base) bash-4.2$ nvidia-smi
Sat Nov  4 14:31:18 2023
+-----------------------------------------------------------------------------+
| NVIDIA-SMI 470.182.03   Driver Version: 470.182.03   CUDA Version: 11.4     |
|-------------------------------+----------------------+----------------------+
| GPU  Name        Persistence-M| Bus-Id        Disp.A | Volatile Uncorr. ECC |
| Fan  Temp  Perf  Pwr:Usage/Cap|         Memory-Usage | GPU-Util  Compute M. |
|                               |                      |               MIG M. |
|===============================+======================+======================|
|   0  Tesla V100-SXM2...  On   | 00000000:06:00.0 Off |                    0 |
| N/A   36C    P0    43W / 163W |      0MiB / 32510MiB |      0%      Default |
|                               |                      |                  N/A |
+-------------------------------+----------------------+----------------------+
|   1  Tesla V100-SXM2...  On   | 00000000:07:00.0 Off |                    0 |
| N/A   40C    P0    44W / 163W |      0MiB / 32510MiB |      0%      Default |
|                               |                      |                  N/A |
+-------------------------------+----------------------+----------------------+
|   2  Tesla V100-SXM2...  On   | 00000000:0A:00.0 Off |                    0 |
| N/A   38C    P0    43W / 163W |      0MiB / 32510MiB |      0%      Default |
|                               |                      |                  N/A |
+-------------------------------+----------------------+----------------------+
|   3  Tesla V100-SXM2...  On   | 00000000:0B:00.0 Off |                    0 |
| N/A   37C    P0    44W / 163W |      0MiB / 32510MiB |      0%      Default |
|                               |                      |                  N/A |
+-------------------------------+----------------------+----------------------+
|   4  Tesla V100-SXM2...  On   | 00000000:85:00.0 Off |                    0 |
| N/A   39C    P0    42W / 163W |      0MiB / 32510MiB |      0%      Default |
|                               |                      |                  N/A |
+-------------------------------+----------------------+----------------------+
|   5  Tesla V100-SXM2...  On   | 00000000:86:00.0 Off |                    0 |
| N/A   38C    P0    43W / 163W |      0MiB / 32510MiB |      0%      Default |
|                               |                      |                  N/A |
+-------------------------------+----------------------+----------------------+
|   6  Tesla V100-SXM2...  On   | 00000000:89:00.0 Off |                    0 |
| N/A   39C    P0    43W / 163W |      0MiB / 32510MiB |      0%      Default |
|                               |                      |                  N/A |
+-------------------------------+----------------------+----------------------+
|   7  Tesla V100-SXM2...  On   | 00000000:8A:00.0 Off |                    0 |
| N/A   39C    P0    43W / 163W |      0MiB / 32510MiB |      0%      Default |
|                               |                      |                  N/A |
+-------------------------------+----------------------+----------------------+

+-----------------------------------------------------------------------------+
| Processes:                                                                  |
|  GPU   GI   CI        PID   Type   Process name                  GPU Memory |
|        ID   ID                                                   Usage      |
|=============================================================================|
|  No running processes found                                                 |
+-----------------------------------------------------------------------------+
(base) bash-4.2$
后面搭建 HPC 集群用到的命令、配置文件,我都总结到了 GitHub。
0. 最终目标
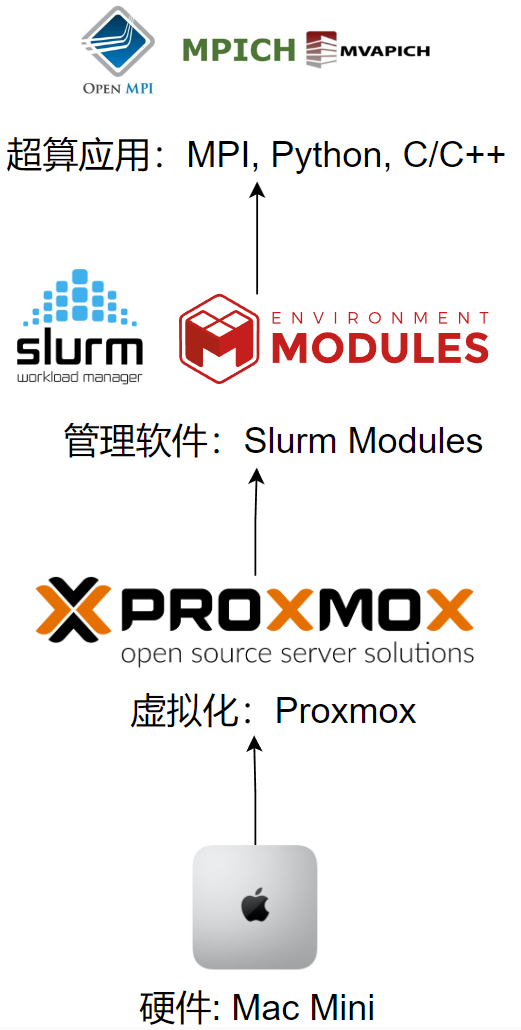
最近在准备学校的 HPC Workshop,于是在想:能不能把闲置的 Mac Mini 改造成一个私有云 HPC 超算,可以灵活新建虚拟机,集成各种开发环境,并且远程提交任务,也就是分三步,实现下面这张图的架构。
- 私有云 (Proxmox):提供虚拟化平台,可以灵活创建不同配置 (CPU, RAM) 的虚拟机;
- 任务调度 (Slurm):提交任务 (job),根据优先级进行调度,这篇文章的重点;
- 应用管理 (Module):管理不同开发环境 CUDA, GCC, Python, Julia 等。
最终可以用 sinfo 查看集群节点,sbatch 提交任务,squeue 查看提交的任务,sacct 查看运行状况。
ubuntu@manager:~$ sinfo
PARTITION AVAIL  TIMELIMIT  NODES  STATE NODELIST
mac*         up   infinite      2   idle compute[01-02]

ubuntu@manager:~$ sbatch hello-submit.sh
Submitted batch job 36

ubuntu@manager:~$ squeue
             JOBID PARTITION     NAME     USER ST       TIME  NODES NODELIST(REASON)
                36       mac hello-wo   ubuntu  R       0:02      1 compute01

ubuntu@manager:~$ sacct -j 36
       JobID    JobName  Partition    Account  AllocCPUS      State ExitCode
------------ ---------- ---------- ---------- ---------- ---------- --------
36           hello-wor+        mac research_+          1    RUNNING      0:0
36.batch          batch            research_+          1    RUNNING      0:0
1. 私有云 (Proxmox)
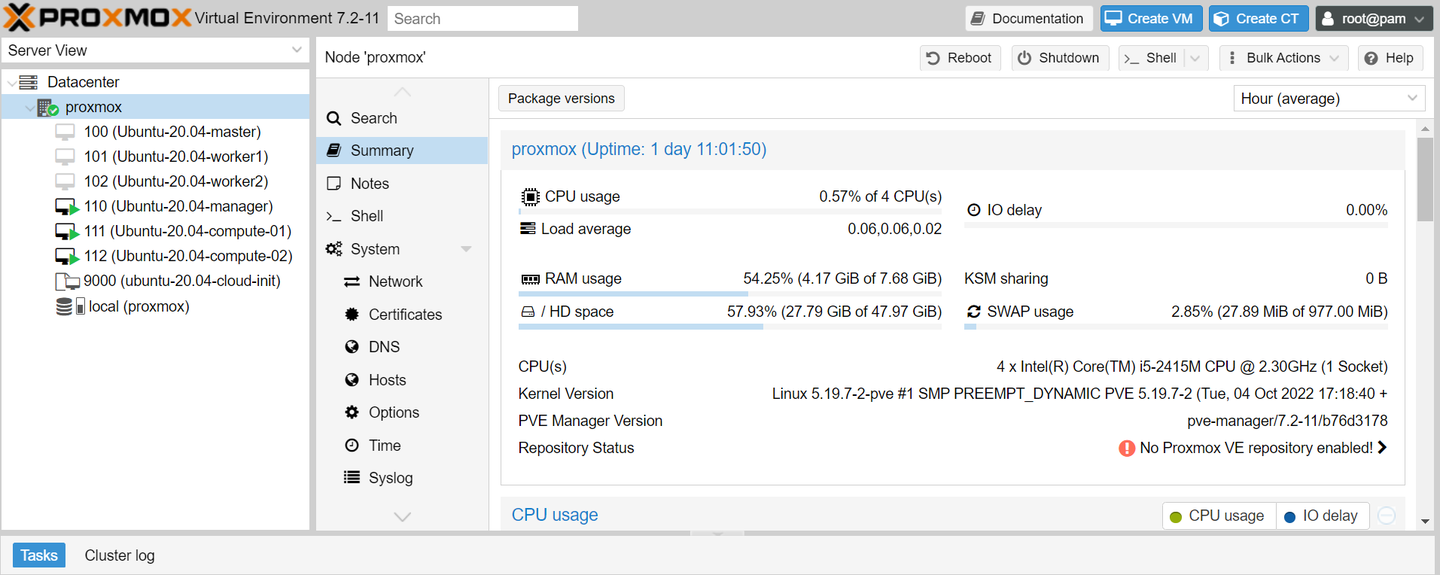
第一步是在 Mac Mini 上搭建一个私有云 (Proxmox),也就是类似 AWS,Azure,GCloud,阿里云,腾讯云,百度云,华为云这样的云平台,可以灵活创建不同 CPU,RAM 的虚拟机,并把他们组建成一个 HPC 集群。
我选择的是轻量级的 Proxmox,而学校的 ISCA 和 Jade 2 是用的开源的 OpenStack。这里顺便一提,华为云也是 OpenStack 换 Logo 和 皮肤 的产物。
2019年,华为云犯了和鸿蒙一样的错误,鸿蒙没有把 Android 替换干净,华为云没有把 OpenStack 替换干净,现在可能系统升级修复了这些 Bug。
一个云平台,虚拟化 (Hypervisor) 非常重要,直接影响虚拟机和顶层应用的性能,比较大的云平台一般有自己的虚拟化技术,例如AWS 的 Xen,微软 的 Hyper-V,IBM 的 KVM,VMware 的 ESXi 等,其中一些开源的 KVM,Boch,LXD/LXC 就在阿里云 (KVM),腾讯云 (Boch),华为云 (OpenStack) 等国内云平台得到了广泛应用,当然这问题不大,Proxmox 也是用的 KVM 和 LXC。
Proxmox 是基于 Debian,如果我们直接下载 Proxmox 官网的镜像只能安装到整个磁盘,我并不想覆盖 Mac Mini 里已经安装的 MacOS 和 Ubuntu,所以先手动分区安装了 Debian,再参照官方文档安装 Proxmox。
- Debian 安装 Proxmox: Install Proxmox VE on Debian 11 Bullseye
如果不介意覆盖整个磁盘安装 Proxmox,直接下载官方镜像,和安装常规 Linux 操作系统一样,这里主要介绍安装好 Proxmox 后如何配置网卡、镜像、虚拟机。
1.1 桥接网络 (Bridge)
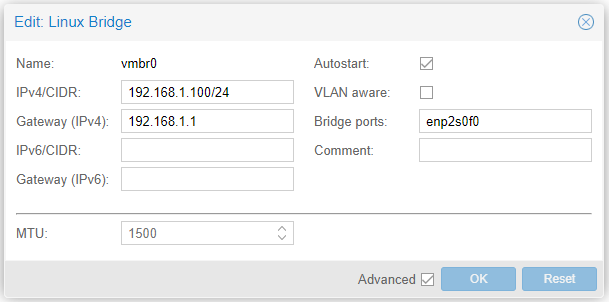
我们需要给新建的虚拟机分配 IP,而我的 Mac Mini 直接连接到了路由器,所以打算创建一个桥接网络,这样虚拟机就可以直接从路由器 DHCP 获取 IP,看起来就好像虚拟机直接有线网连到了路由器一样。
比如我路由器的 LAN 子网是 192.168.1.0/24,Proxmox 连到路由器可能有个 IP: 192.168.1.3,Proxmox 云平台里新建的虚拟机可以分配到 192.168.1.101,和 Proxmox 是平级的。
在 Proxmox 的 System --> Network --> Create --> Linux Bridge,填入下面的配置,当然 IPv4 网段和 网卡 enp2s0f0 根据自己的实际情况需要调整。
1.2 虚拟机镜像
我后面用的 Ubuntu 20.04 组建 HPC 节点,登录到 Proxmox 控制台后,下面的命令下载 Ubuntu Cloud Image,并且创建一个 VM Template,这样后面创建虚拟机就可以一键复制模板,类似 AWS 的 t2, t3 模板:
- t2.nano (1 vCPU and 0.5 GiB memory)
- t2.micro (1 vCPU and 1 GiB memory)
- t2.small (1 vCPU and 2 GiB memory)
# Log into Proxmox

# Create Ubuntu Cloud Image
$ curl -O http://cloud-images.ubuntu.com/releases/focal/release/ubuntu-20.04-server-cloudimg-amd64.img
$ sudo apt install libguestfs-tools -y
$ sudo virt-customize -a ubuntu-20.04-server-cloudimg-amd64.img --install qemu-guest-agent --truncate /etc/machine-id

# Create a template VM
$ sudo qm create 9000 \
         --name ubuntu-20.04-cloud-init --numa 0 --ostype l26 \
         --cpu cputype=host --cores 1 --sockets 1 \
         --memory 1024  \
         --net0 virtio,bridge=vmbr0

# Replace local with your local storage (e.g. local-lvm)
$ sudo qm importdisk 9000 ubuntu-20.04-server-cloudimg-amd64.img local  -format qcow2
$ sudo qm set 9000 --scsihw virtio-scsi-pci --scsi0 /var/lib/vz/images/9000/vm-9000-disk-0.qcow2
$ sudo qm resize 9000 scsi0 +6G
$ sudo qm set 9000 --ide2 local:cloudinit
$ sudo qm set 9000 --boot c --bootdisk scsi0
$ sudo qm set 9000 --serial0 socket --vga serial0
$ sudo qm set 9000 --agent enabled=1
这样我们在 Proxmox 里就有了一个 Ubuntu 20.04 (1核1G,8G硬盘) 的模板。

在上面图中的 Cloud-Init 选项里,我们可以配置虚拟机默认的用户名和密码,还有 SSH Key,这样我们虚拟机开机就可以直接登录,类似 AWS 新建一个 EC2 节点后会让你下载登录用的 pem 密钥。

最后把我们前面的配置,转换成一个虚拟机模板。
$ qm template 9000
1.3 创建虚拟机
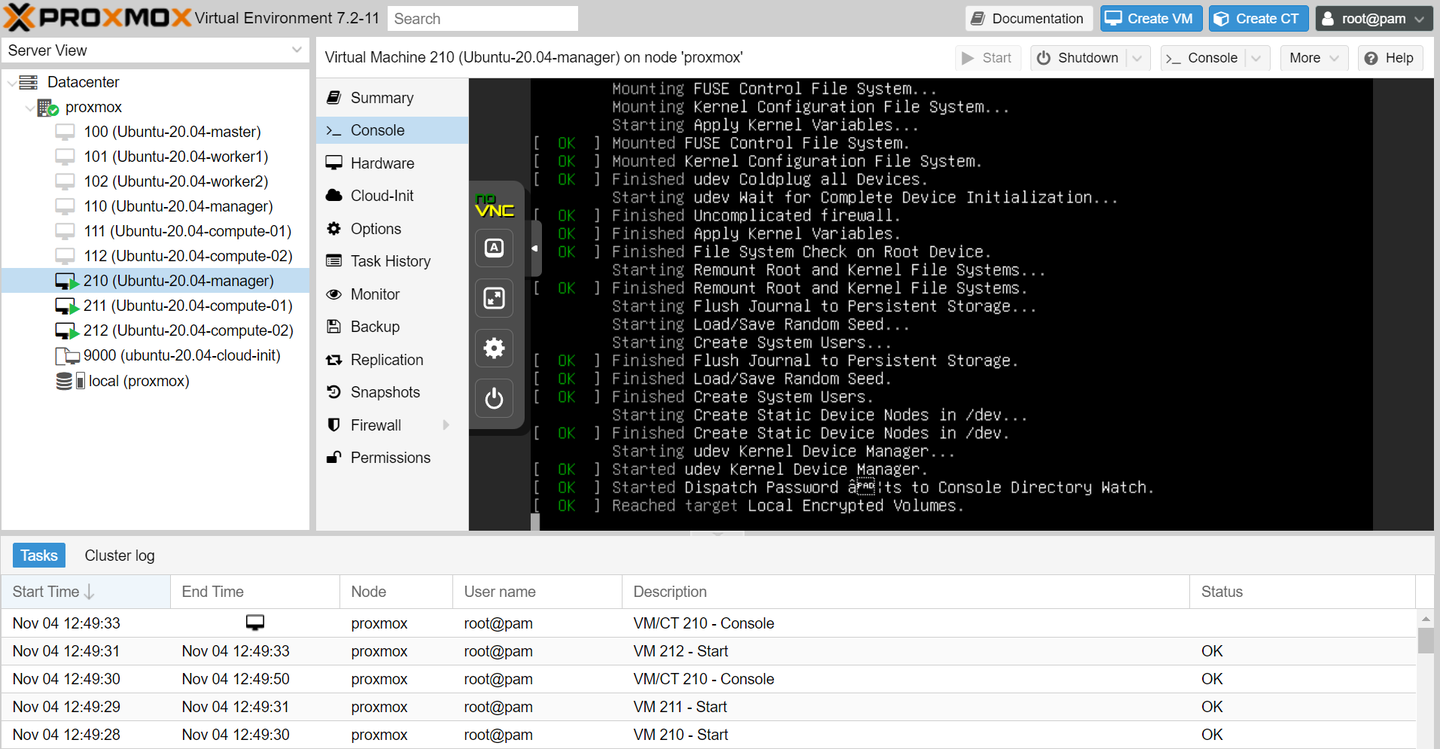
有了前面创建的模板,我们就可以创建3个Ubuntu 虚拟机,作为 HPC 的节点。
$ qm clone 9000 110 --name Ubuntu-20.04-manager --full
$ qm clone 9000 111 --name Ubuntu-20.04-compute-01 --full
$ qm clone 9000 112 --name Ubuntu-20.04-compute-02 --full
这样3条命令,我们就有了3个 Ubuntu 虚拟机,分别为 manager, compute01, compute02,开机后 Proxmox 会利用前面的 Linux Bridge 帮它们从路由器申请 IP,我们可以登录到虚拟机修改主机名。
$ ssh ubuntu@192.168.1.219
$ sudo hostnamectl set-hostname manager

$ ssh ubuntu@192.168.1.181
$ sudo hostnamectl set-hostname compute01

$ ssh ubuntu@192.168.1.152
$ sudo hostnamectl set-hostname compute02
2. 任务调度 (Slurm)
有了3个虚拟机节点后,这是最重要的一步,需要安装 Slurm 把它们组建成一个 HPC 集群。
Slurm 是全球非常受欢迎的超算任务调度器,平常我们在超算上用的 sinfo,sbatch, squeue, sacct 就是由 Slurm 提供的。

在使用超算的时候,我们会发现 HPC 可以提交任务,文件自动同步,还有一些预装的软件,但这其实是 3 个部分,Slurm 只提供任务管理,文件同步需要我们自己配置 NFS 文件共享,Module 则是另一个软件负责管理开发环境。
2.1 NFS 文件共享
我们首先需要在不同 Ubuntu 虚拟机节点上建立共享的文件夹,这样任务分配到不同节点执行后,在其他节点也可以同步文件输出,这里我创建了 /mnt/slurmfs 共享文件夹。
# For the manager node
$ sudo apt install ntpdate nfs-kernel-server -y

# Create a shared folder /mnt/slurmfs
$ sudo mkdir /mnt/slurmfs
$ sudo chown nobody.nogroup /mnt/slurmfs
$ sudo chmod -R 777 /mnt/slurmfs

# Auto-mount the NFS folder
$ sudo vim /etc/exports

    /mnt/slurmfs    <lan network>(rw,sync,no_root_squash,no_subtree_check)
    /mnt/slurmfs    192.168.1.0/24(rw,sync,no_root_squash,no_subtree_check)

$ sudo exportfs -a
$ sudo systemctl restart nfs-kernel-server
接下来在每一个子节点上挂载目录:
# For each compute node (Replace the MANAGER_IP)
$ sudo apt install ntpdate nfs-common -y
$ sudo mkdir /mnt/slurmfs
$ sudo chown nobody.nogroup /mnt/slurmfs
$ sudo mount MANAGER_IP:/mnt/slurmfs /mnt/slurmfs

$ Auto-mount the NFS folder
$ sudo vim /etc/fstab
    <manager node ip>:/mnt/slurmfs    /mnt/slurmfs    nfs    defaults   0 0
    192.168.1.219:/mnt/slurmfs    /mnt/slurmfs    nfs    defaults   0 0

$ sudo mount -a
2.2 Slurm 安装
前面操作都非常简单,并没有涉及 HPC,到这里我们就要安装核心的 Slurm 调度器了。
我们需要在一个 manager 节点上启动 slurmctld,2 个 compute 节点上启动 slurmd。
首先,在 manager 节点上安装 slurm,并且修改配置文件,另外 manager 和 compute 是通过 muge 来通信的。
# For the manager

$ sudo apt install slurm-wlm -y
$ cd /etc/slurm-llnl
$ sudo cp /usr/share/doc/slurm-client/examples/slurm.conf.simple.gz .
$ sudo gzip -d slurm.conf.simple.gz
$ sudo mv slurm.conf.simple slurm.conf
在 slurm 的配置文件里,我们需要定义 HPC 集群的节点名称:
$ sudo vim /etc/slurm-llnl/slurm.conf

    SlurmctldHost=manager
    NodeName=compute01 NodeAddr=192.168.1.181 CPUs=1 State=UNKNOWN
    NodeName=compute02 NodeAddr=192.168.1.152 CPUs=1 State=UNKNOWN
    PartitionName=macNodes=compute[01-02] Default=YES MaxTime=INFINITE State=UP
以及每个节点的资源限制,比如我们可能不希望计算占用了节点的全部资源,需要预留一些 CPU 管理通信。
$ sudo vim /etc/slurm-llnl/cgroup.conf

    CgroupMountpoint="/sys/fs/cgroup"
    CgroupAutomount=yes
    CgroupReleaseAgentDir="/etc/slurm-llnl/cgroup"
    ConstrainCores=no
    TaskAffinity=no
    ConstrainRAMSpace=yes
    ConstrainSwapSpace=no
    ConstrainDevices=no
    AllowedRamSpace=100
    AllowedSwapSpace=0
    MaxRAMPercent=100
    MaxSwapPercent=100
    MinRAMSpace=30
最后我们把配置文件复制到 NFS 文件夹,这样其他节点就可以共享相同的配置文件了。
$ sudo cp /etc/slurm-llnl/slurm.conf /etc/slurm-llnl/cgroup.conf /mnt/slurmfs/
$ sudo cp /etc/munge/munge.key /mnt/slurmfs/

$ sudo systemctl enable munge
$ sudo systemctl restart munge

$ sudo systemctl enable slurmctld
$ sudo systemctl restart slurmctld
在每个 compute 节点上,我们做类似的配置:
# For each compute node
$ sudo apt install slurmd slurm-client -y

$ sudo cp /mnt/slurmfs/munge.key /etc/munge/munge.key
$ sudo cp /mnt/slurmfs/slurm.conf /etc/slurm-llnl/slurm.conf
$ sudo cp /mnt/slurmfs/cgroup* /etc/slurm-llnl

$ sudo systemctl enable munge
$ sudo systemctl restart munge

$ sudo systemctl enable slurmd
$ sudo systemctl restart slurmd
如果一切顺利,我们就可以看到集群的信息了。
$ sinfo -N

NODELIST   NODES    PARTITION   STATE
compute01      1     proxmox*    idle
compute02      1     proxmox*    idle
如果很不幸,集群并没有起来,比如看到下面的报错:
ubuntu@compute02:~$ sinfo -N
slurm_load_partitions: Zero Bytes were transmitted or received
这说明 munge 通信出了异常,前面我们修改了 munge 的 key,需要在每个节点重启 munge。
# On both the manager node and compute nodes
$ sudo systemctl restart munge
到这里,我们就可以使用 sbatch 提交任务,squeue 查看任务了,但是并不能使用 sacct 查看任务运行记录,这需要 MySQL 数据库记录任务运行情况。
2.3 Slurm Accounting (MySQL)
我们首先在 manager 上安装 MariaDB。
# For the manager node
$ sudo apt-get -y install slurmdbd mariadb-server

$ sudo vim /etc/mysql/mariadb.conf.d/50-server.cnf
    bind-address            = 0.0.0.0

    innodb_buffer_pool_size=512M
    innodb_log_file_size=64M
    innodb_lock_wait_timeout=900

$ sudo systemctl enable mariadb
$ sudo systemctl restart mariadb
接下来我们给 MariaDB 配置 Slurm 需要的数据库。
$ sudo mysql_secure_installation
$ sudo mysql -u root -p
    > grant all on slurm_acct_db.* TO 'slurm'@'%' identified by 'my_password' with grant option;
    > create database slurm_acct_db;
    > grant all on slurm_jobcomp_db.* TO 'slurm'@'%' identified by 'my_password' with grant option;
    > create database slurm_jobcomp_db;
为了让 slurm 和 数据库 通信,我们需要配置 slurmdbd 服务。
# You can also use slurmdbd.conf in this GitHub repo
$ sudo vim /etc/slurm-llnl/slurmdbd.conf
    AuthType=auth/munge

    DbdHost=manager
    DbdAddr=192.168.1.219
    DbdPort=6819
    DebugLevel=info

    LogFile=/var/log/slurm-llnl/slurmdbd.log
    PidFile=/var/run/slurmdbd.pid

    SlurmUser=slurm
    StorageType=accounting_storage/mysql
    StorageHost=manager
    StorageUser=slurm
    StoragePass=my_password
    StorageLoc=slurm_acct_db

$ sudo systemctl enable slurmdbd
$ sudo systemctl restart slurmdbd

# You can also use slurm_acct.conf in this GitHub repo
$ sudo vim /etc/slurm-llnl/slurm.conf
    # LOGGING AND ACCOUNTING
    AccountingStorageHost=manager
    AccountingStorageLoc=slurm_acct_db
    AccountingStorageUser=slurm
    AccountingStorageType=accounting_storage/slurmdbd
    AccountingStoragePort=6819

    JobCompType=jobcomp/mysql
    JobCompHost=manager
    JobCompUser=slurm
    JobCompPass=my_password
    JobContainerType=job_container/none
    JobAcctGatherType=jobacct_gather/linux

$ sudo cp /etc/slurm-llnl/slurm.conf /mnt/slurmfs/slurm.conf
$ sudo systemctl restart slurmctld
由于我们修改了 slurm.conf,需要重启每一个 compute 节点的 slurmd 服务。
# For each compute node
$ sudo cp /mnt/slurmfs/slurm.conf /etc/slurm-llnl/slurm.conf
$ sudo systemctl restart slurmd
一切正常的话,我们就可以在 sacctmgr 里看到自己的 HPC 集群了。
# Check if the cluster is added to the manager
$ sacctmgr list cluster
   Cluster     ControlHost  ControlPort   RPC     Share GrpJobs       GrpTRES GrpSubmit MaxJobs       MaxTRES MaxSubmit     MaxWall                  QOS   Def QOS
---------- --------------- ------------ ----- --------- ------- ------------- --------- ------- ------------- --------- ----------- -------------------- ---------
   proxmox   192.168.1.219         6817  8704         1                                                                                           normal

# If not, the cluster can be added using sacctmgr
$ sudo sacctmgr add cluster proxmox
如果这里很不幸 proxmox 加入到节点失败,可以检查一下节点直接是不是能互相 ping 通,最好在 /etc/hosts/ 文件里定义好各自的 IP。
# /etc.hosts on both the manager node and compute nodes
192.168.1.219 manager
192.168.1.181 cpmpute01
192.168.1.152 compute02
到这里,我们就有一个完整的 HPC 集群了,并且 Slurm 会自动记录过去的任务,我们可以尝试提交一个任务,例如创建 hello-world-submit.sh:
#!/bin/sh
#SBATCH --export=ALL # export all environment variables to the batch job.
#SBATCH -p mac # submit to the serial queue
#SBATCH --time=00:10:00 # Maximum wall time for the job.
#SBATCH --nodes=1 # specify number of nodes.
#SBATCH --ntasks-per-node=1 # specify number of processors per node
#SBATCH --mail-type=END # send email at job completion
#SBATCH --output=hello-world.o
#SBATCH --error=hello-world.e
#SBATCH --job-name=hello-world

## print start date and time
echo Job started on:
date -u

echo "hello-world"

## print node job run on
echo -n "This script is running on "
hostname

sleep 60
## print end date and time
echo Job ended on:
date -u
接下来就可以提交,查看任务了:
ubuntu@manager:~$ sbatch hello-world-submit.sh
Submitted batch job 2

ubuntu@manager:~$ squeue
             JOBID PARTITION     NAME     USER ST       TIME  NODES NODELIST(REASON)
                 2       mac hello-wo   ubuntu  R       0:02      1 compute01

ubuntu@manager:~$ sacct -j 2
       JobID    JobName  Partition    Account  AllocCPUS      State ExitCode
------------ ---------- ---------- ---------- ---------- ---------- --------
2            hello-wor+        mac                     1  COMPLETED      0:0
2.batch           batch                                1  COMPLETED      0:0
到这里,最复杂的部分 Slurm + Accounting 就配置完了,接下来就是很轻松的 Module 和 MPI 了。
3. 应用管理 (Module)
最后为了管理超算上面的应用,我们需要用到 Module 这个软件,为了并行加速需要 MPICH。
3.1 MPI 并行
相比之前的 Slurm,现在已经非常简单了。
$ srun --nodes=2 sudo apt install openmpi-bin openmpi-common libopenmpi3 libopenmpi-dev -y
3.2 Module 环境管理
同样,我们需要在每个节点上安装 Module。
# On the manager
$ srun --nodes=2 sudo apt install build-essential tcl-dev tcl -y

# For each compute node
$ curl -LJO https://github.com/cea-hpc/modules/releases/download/v5.3.1/modules-5.3.1.tar.gz
$ tar xfz modules-5.3.1.tar.gz
$ cd modules-5.3.1
$ ./configure
$ make
$ sudo make install
$ sudo ln -s /usr/local/Modules/init/profile.sh /etc/profile.d/modules.sh
$ sudo ln -s /usr/local/Modules/init/profile.csh /etc/profile.d/modules.csh
这样就可以用 Module 管理不同的软件环境了:CUDA,Python,GCC,Julia。
总结
在安装完 Proxmox,NFS,Slurm,Module,MPI 后,我们终于把 Mac Mini 改造成了自己的 HPC 超算平台,虽然硬件资源比较弱,但是私有云,虚拟化,任务调度,软件管理,并行计算,应有尽有。
ubuntu@manager:~$ sbatch hello-world-submit.sh
Submitted batch job 2

ubuntu@manager:~$ squeue
             JOBID PARTITION     NAME     USER ST       TIME  NODES NODELIST(REASON)
                 2       mac hello-wo   ubuntu  R       0:02      1 compute01

ubuntu@manager:~$ sacct -j 2
       JobID    JobName  Partition    Account  AllocCPUS      State ExitCode
------------ ---------- ---------- ---------- ---------- ---------- --------
2            hello-wor+        mac                     1  COMPLETED      0:0
2.batch           batch                                1  COMPLETED      0:0